Hi, How Can We Help?
GETTING STARTED
1. How to I register as a Vendor?
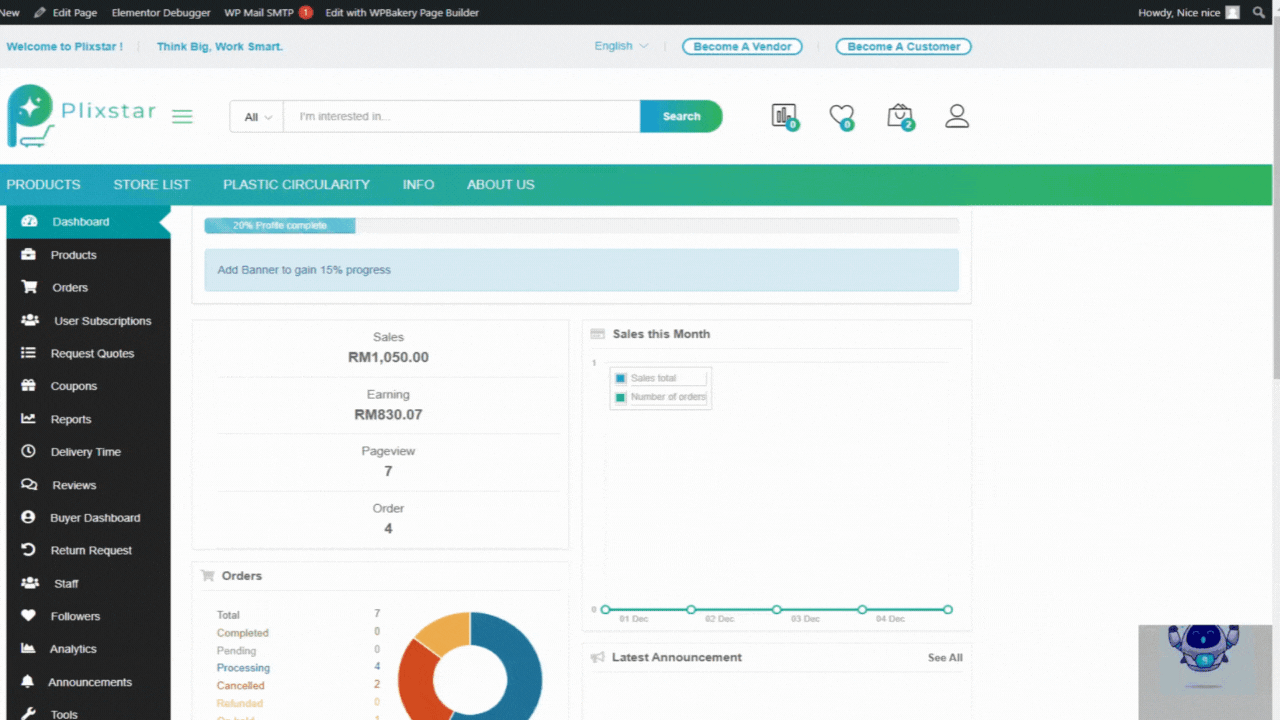
2. How to change/update my personal information?
To change/update your particulars, go to the drop-down list by clicking on your User Icon (at the upper-right corner of the App) and select “Account Setting” On the “My account” page, click “Account Details” to access your registered details. You may change any of your particulars, including your password, and save your changes before exiting
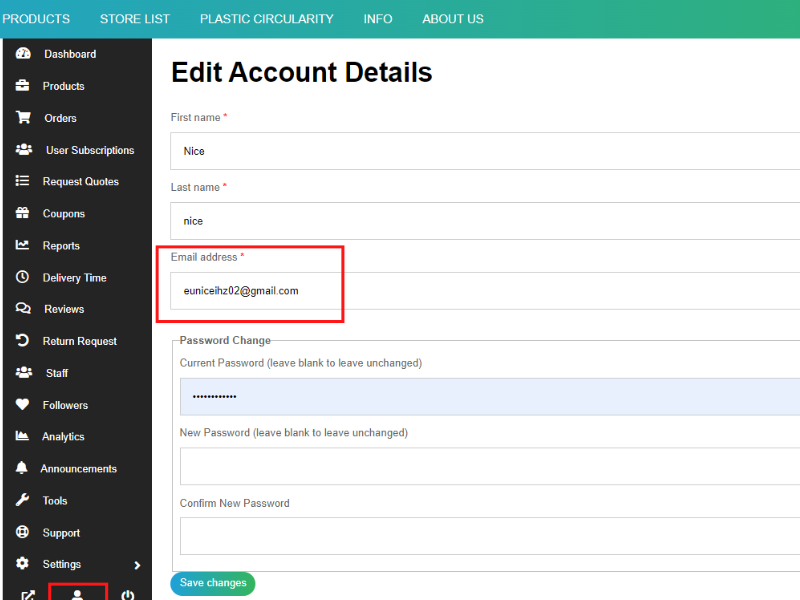
3. Can I change the email address after register as a Vendor?
Yes, you can. Click “Edit Account” icon, you can change your email address and account details as below.
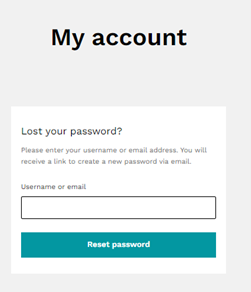
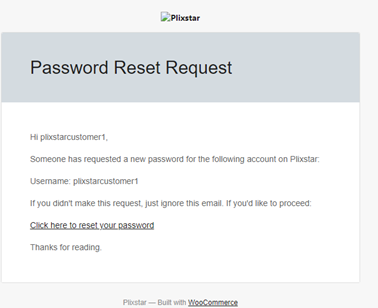
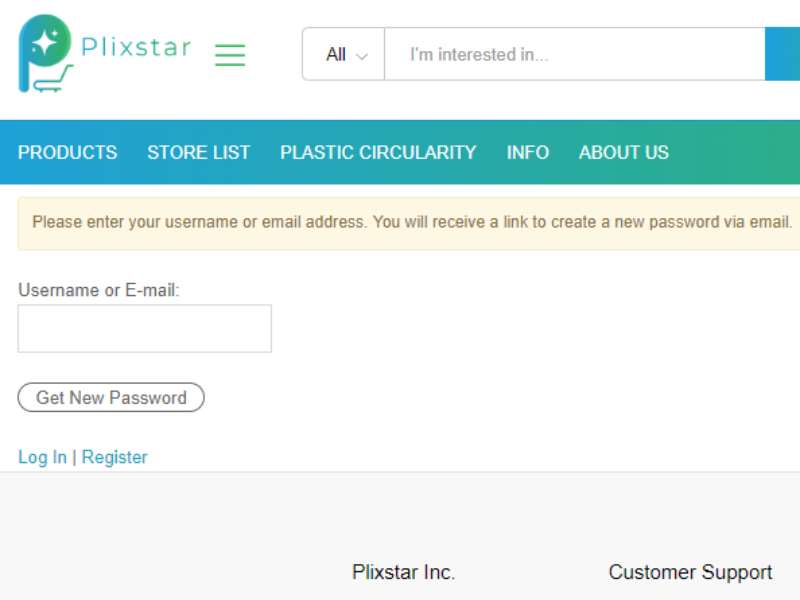
4. How to reset my password?
Under “My Account”, click on “Forgot your password?”. Then it will switch to the page “Lost your password?”, key in your username or email address then click “Reset Password”
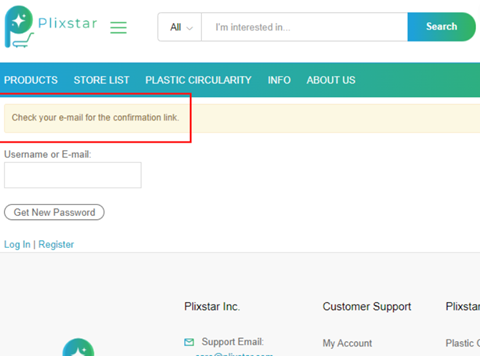
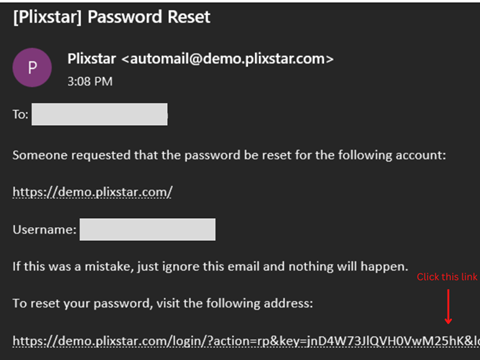
Then a message will prompt on the screen as below
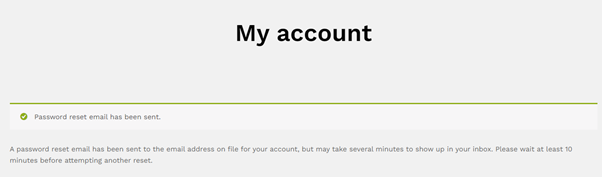
Check your email inbox or junk mail. Read thru and follow the instructions.
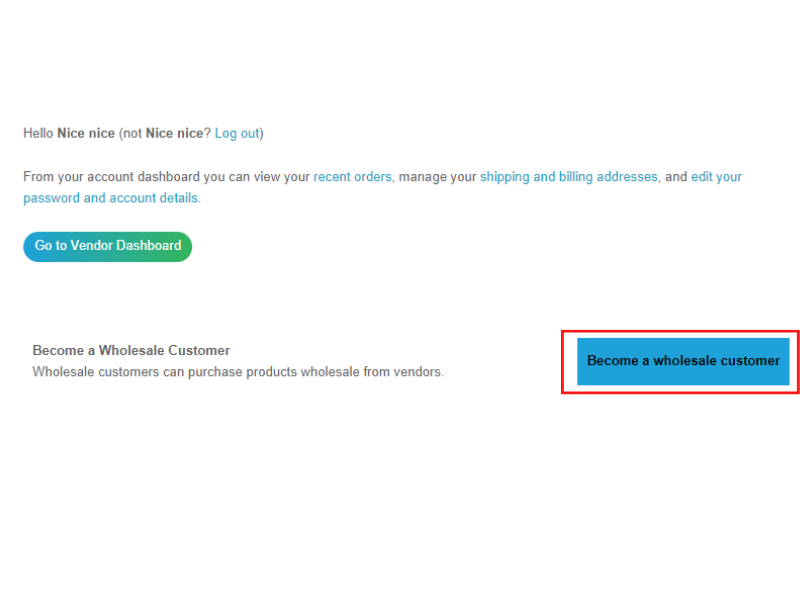
5. How to sign up as Customer / Wholesaler after as a vendor?
When you sign up as a Vendor, Plixstar auto register you as a customer at the same time. You can see “Buyer Dashboard” at the “Vendor dashboard”.
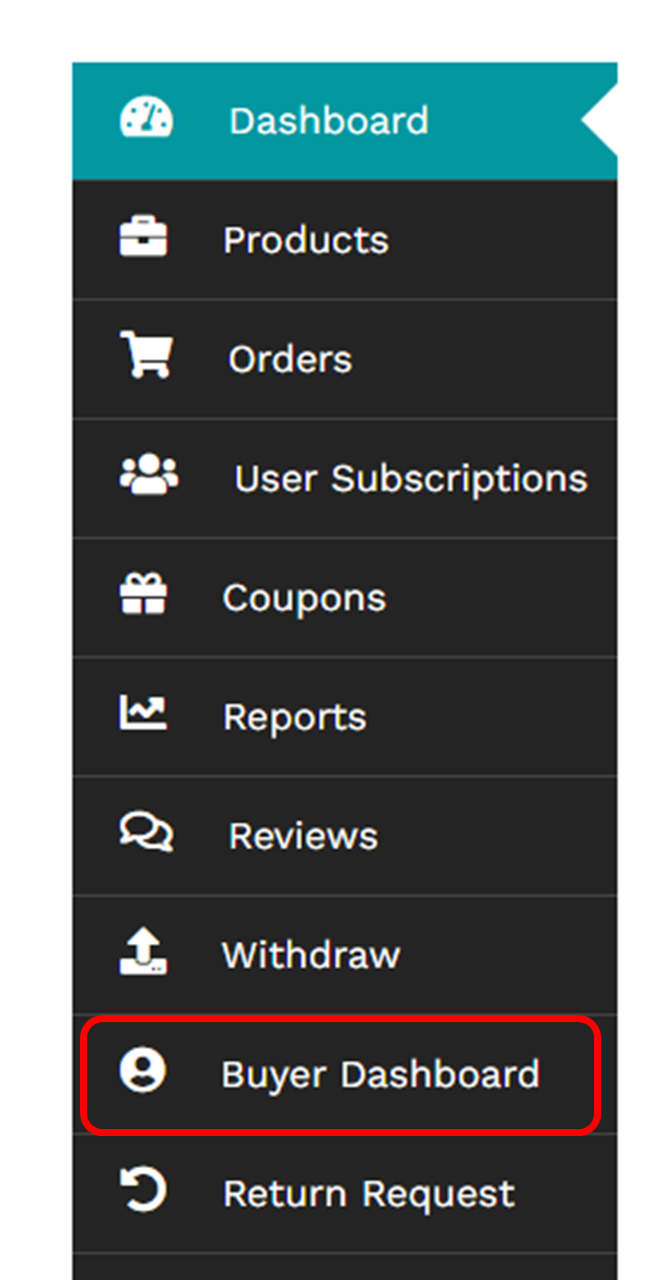
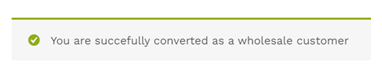
To sign up as a “Wholesaler”, Go to “Buyer Dashboard”, under “My Account”, click the “Become a wholesale customer” button.
A message will prompt once successful.
6. What should I do if I forgot my password?
Under “My Account”, click on “Forgot your password?”. Then it will switch to the page “Lost your password?”, key in your username or email address then click “Reset Password”
Then a message will prompt on the screen as below
Check your email inbox or junk mail. Read thru and follow the instructions.
7. Why haven’t I receive any email notification?
Check your email inbox or junk mailbox or spam mailbox
8. Is it possible to create staff under any vendor to manage the store?
It’s great if the store has a good amount of products and orders. But managing that store alone, it’s a bit difficult. But with the Dokan Vendor Staff Manager module, it’s possible to allow vendors to add multiple staff to their store where each of those staff will get separate user IDs.
9. Why I am getting 404 error message on the vendor dashboard?
It seems like there is a permalinks configuration problem.
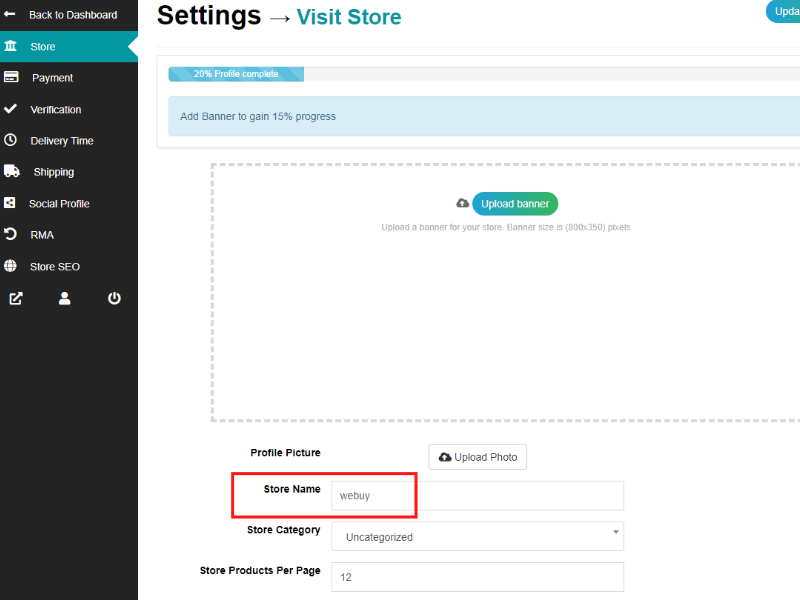
10. Can change the shop name after registered?
Yes, you can. Under “Setting – Shop”, under the “Shop Name” column.
11. Is it possible to create staff account to manage my store?
Yes, you can create multiple staffs account to help you in managing the store where each of those staffs will get separate user IDs and the permission is set by you.
12. How do I sign-up to become a vendor on Plixstar?
As easy as O.P.E.N.$
13. Does Plixstar allows a vendor to open multiple stores?
No, Plixstar does not support multiple stores for a single vendor.
14. Is it possible to use external plugin for wholesale marketplace?
No, it is NOT possible to use your own external plugin for Plixstar wholesale marketplace.
15. Is there any private messaging system between customer and vendor?
In Plixstar private messaging system is not available but we have alternate option. You can use Plixstar Store Support add-on which will allow a customer to create support ticket to the vendor. Vendor will be able to view and reply to the ticket from their dashboard.
16. Can I create variable products in Plixstar?
Yes, you can upload variable product from the vendor dashboard.
17. Can I upload bulk product on my store?
Yes, a vendor can upload bulk product by using Export/Import add-on. Which will allow to import CSV file.
18. Do I have ability to display discount on the store?
In Plixstar, each vendor can create and display their coupon on the store page.
19. Can I share my own store on social media?
Yes, the vendor can share their store page to social media.
20. Is bulk order processing possible with Plixstar?
No, Bulk order processing is not possible.
21. Can I offer discount to customer through coupon code?
Yes, it is possible to offer discount through coupon code
22. Can I have multi store?
No, it is not possible for a single vendor to maintain multiple stores.
23. Can I become vendor and customer using a single account?
If a user registers as a vendor the user role will be a vendor. But a vendor is able to buy a product from other vendors, the user role will not be changed in the case.
24. Vendor Verification
25. Create staff account
Product Listing
1. How to add a product?
2. Add New Product
3. Can I create the Brand?
No, you can’t. Admin can set a brand for vendors’ products from an existing Brand list. You could only set the brand created by the admin.
4. Can I set sell only physical products?
Yes, you can.
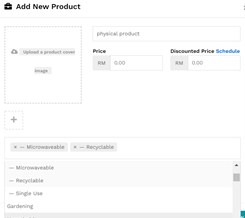
5. Can I set sell both physical and digital products?
Yes, you can.
6. Would my product be rejected?
Yes, Admin has the authority to review the product and reject it if found again the rules.
7. How to create Coupon ?
[vendor-coupon] To create a new coupon for your store, navigate to Vendor Dashboard->Coupons. Then click on Add New Coupon.
Next, fill the fields with all the details and then Add New Coupon.
Essential fields at a glance:
Coupon Title: Add the name you want to give your coupon.
Description: In this field, you can add what the coupon is about.
Discount Type: This drop-down lets vendors select between a percentage and a fixed amount for your discount.
Amount: Add the discount amount (percentage/fixed) here.
Email Restrictions: Choose to limit the coupon to certain emails if you like. If you insert an email then only customers with that email would be able to use the coupon.
Usage Limit: Add the number here if you want to restrict coupon usage to a certain amount.
Expire Date: If you would like for the coupon to remain usable only up to a certain time, select the expiry date from here.
Exclude Sale Items: Vendors can select this checkbox if they want to opt-out sale items from the coupon offer.
Minimum Amount: Select the minimum amount an order should be for a customer to apply for the coupon.
Product: Vendors can select one, multiple, or all products they are selling at their respective stores.
Apply for New Products: if you check this box then when a customer applies this coupon for a new product then the customer will get discount accoding to that coupon.
Exclude products: Vendors can also exclude the coupon from applying to a particular product or multiple products.
Show on store: Select this checkbox to display the coupon code on your storefront
8. What are the type of coupons can be set?
Product (Fixed Amount) Discount
Fixed Amount Discount coupon means when a customer uses the coupon s/he will get a fixed amount discount mentioned on the coupon. Whatever the total order amount is s/he will get the same amount discount.
Product Percentage (%) Discount
Product Percentage Discount means when a customer uses the coupon in his/her order then s/he will get a discount depends on his order total amount. He/she will get a discount of the percentage mentioned on the coupon of their total order.
To use this option, select Product % Discount from Discount Type drop-down.
9. Can the coupon set Product (Fixed Amount) Discount?
Yes you can. To use this option, select Product Discount from Discount Type drop-down.
This will also show when you view all your coupons from the Vendor Dashboard as Fixed Amount under Coupon Type.
10. What does Plixstar Vendor Review do?
Allow customers on your marketplace to post a review and rank the vendor.
In Plixstar, each vendor has a storefront where the review and rating are displayed. Without this module, the rating and reviews are aggregated from the product reviews. But you can make the reviews vendor specific with this extension, making the reviews more clear and customers will be able to decide about buying from a vendor faster. With this feature added, vendors will strive to get better reviews and rankings, your vendors will gain more trust and make more sales.
The vendors cannot change or moderate the reviews
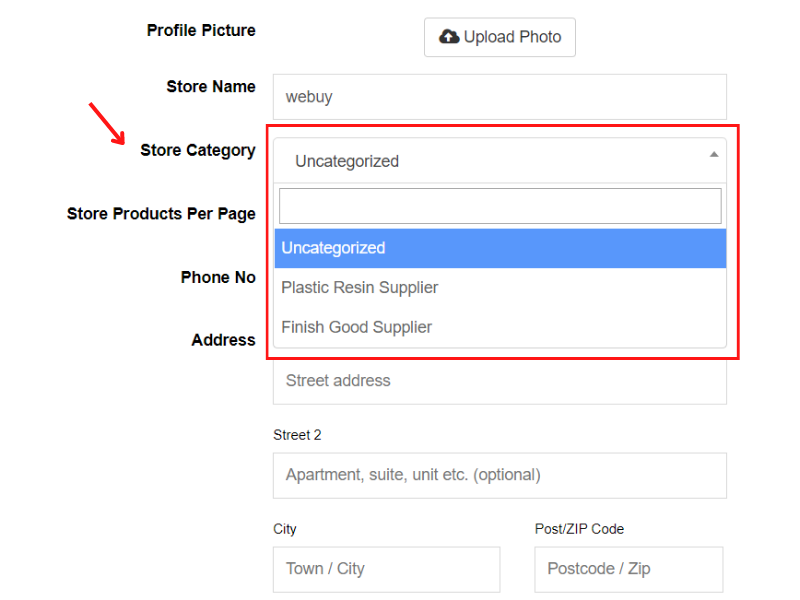
11. How to add Store Categories
When there are enough categories that have been created by the Admin, vendors can select store categories from the Dashboard.
Vendors will have to navigate to the Vendor Dashboard → Settings → Store. There is an option to select categories that Admin has created. Vendors can select the one that they feel appropriate.
12. Can I upload files while registering?
Yes, you can use any element while building the registration form, including, image and all kind of WordPress permitted files.
13. Can I upload and attach images to post?
Yes, you can upload and attach images to post body. You can also upload featured image or attach files to download.
14. Can I post videos from front?
Yes, you can upload videos as files or you can embed videos from YouTube, Vimeo etc. via the richtext editor.
ORDER
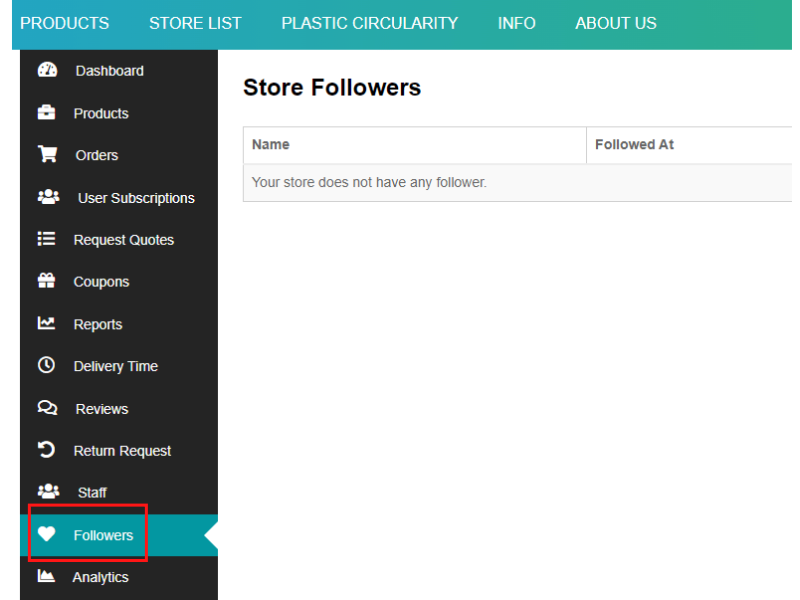
1. Can I view how many followers on my store ?
Vendor View
When vendors activate this module, in the frontend dashboard of a vendor, an option of “Followers” will show automatically.
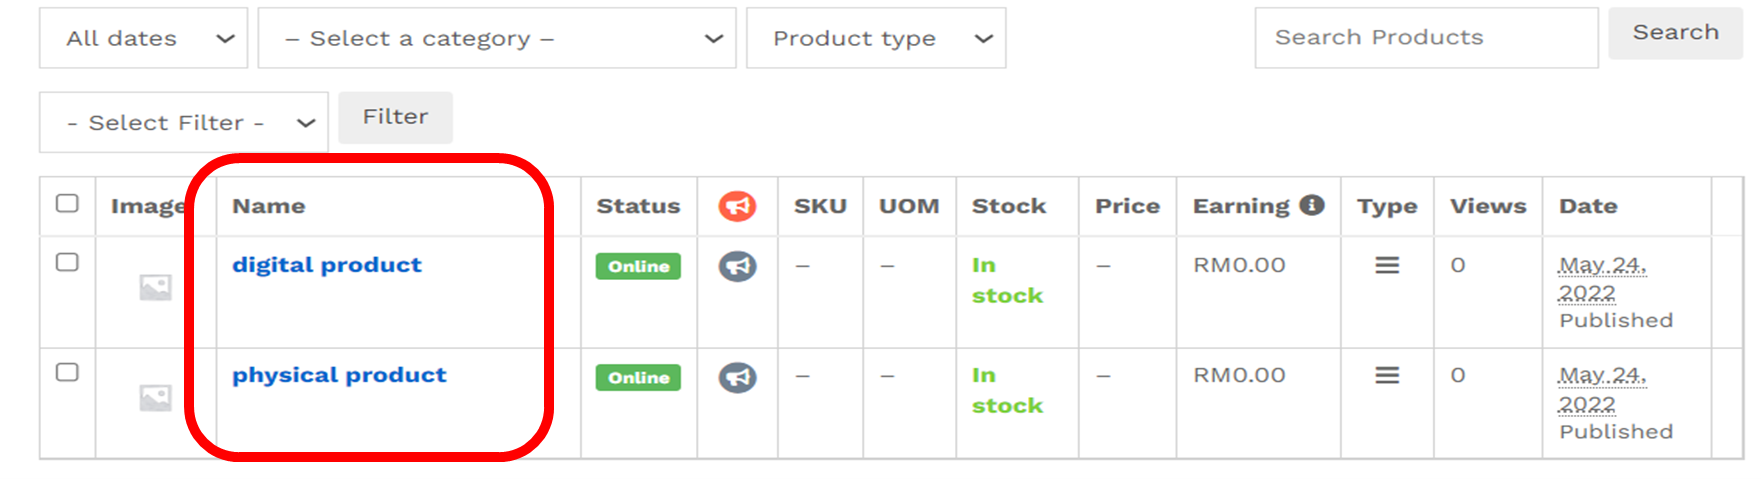
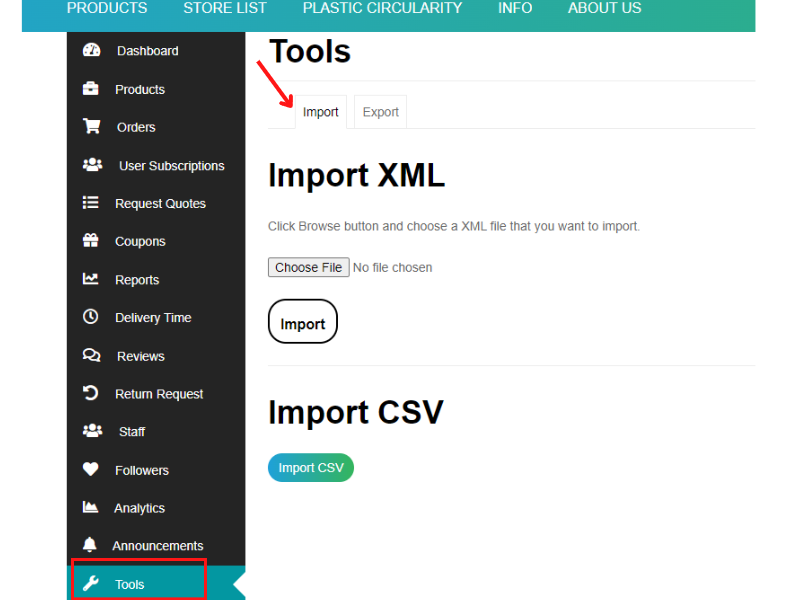
2. Can I import or export files?
Import
Log in to your vendor account. Navigate to Vendor Dashboard→Tools.
Select the Import tab.
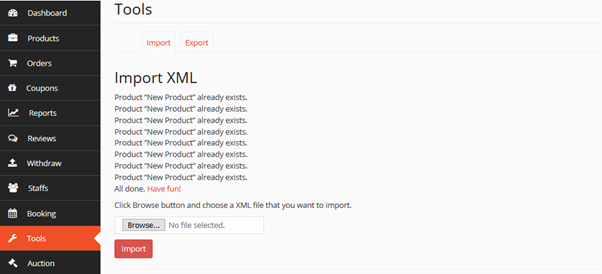
Importing as XML
If you want to import your data and information as XML, just select your existing .xml file by clicking on Browse. Then click the red Import button.
Your product information would be restored shortly. However, you must restore the image files for the products in the /wp-content/uploads folder manually.
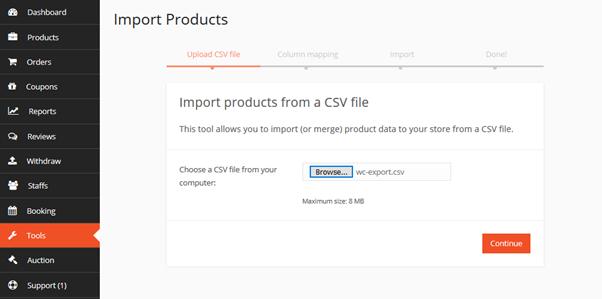
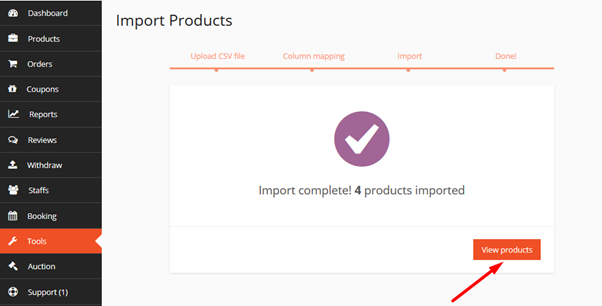
Importing Products as CSV File
To import your backed up products as CSV, click on the Import button.

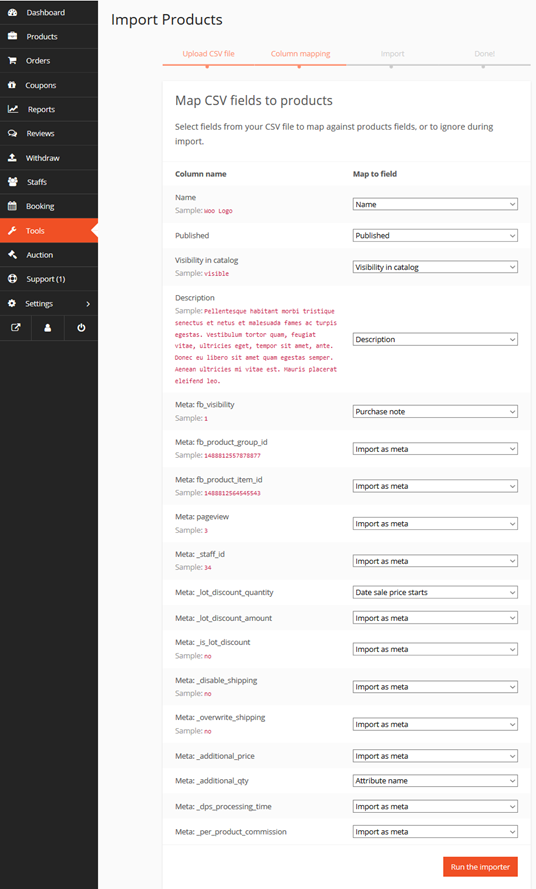
Choose the CSV file from your computer you want to import and click on the Continue button. On the next step, you will have to map columns and finally import. When the process is complete, you will get a confirmation message. Now you can check your products on the listing page.
Step 1: Map your CSV file against the column file
Step 2: Import will start
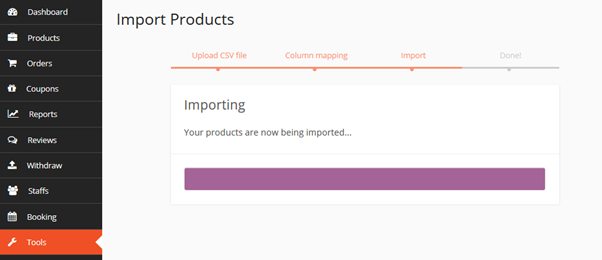
Step 3: View Products
Export
Log in with your vendor account. Navigate to Vendor Dashboard→Tools.
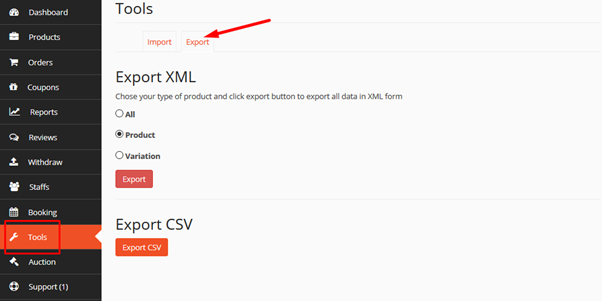
Export as XML
Select the option you need from All, Product or Variation, and hit the Export button. An .xml file with all your product data will be compiled and downloaded.
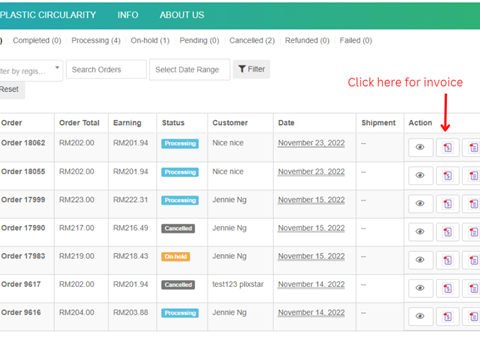
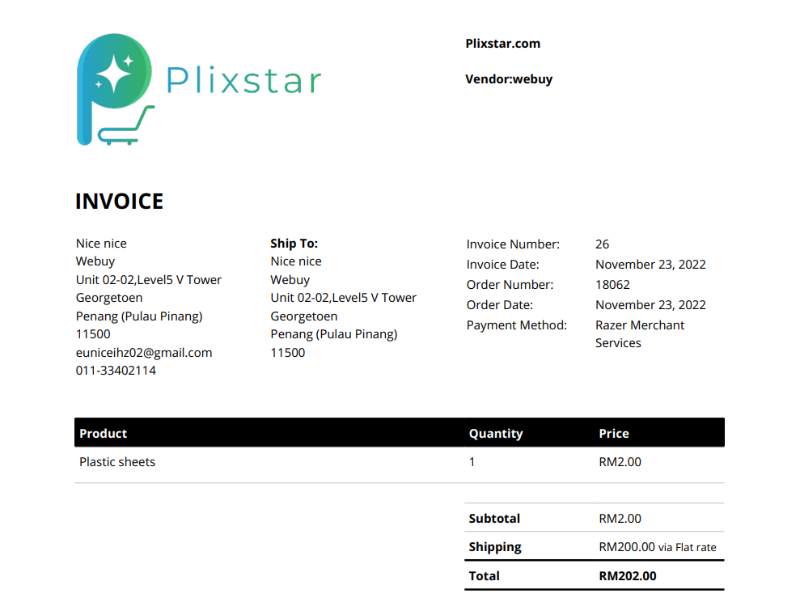
3. Can I generate the invoices ?
Yes, you can also generate the invoices. You have to go to Vendor Dashboard→Orders press the PDF Invoice button which appears at the right of each order. The admin and vendor’s invoice are absolutely the same.
4. Can Customers get their invoices for the orders they make?
Customers can also get their invoices for the orders they make. Customer has to go to My Orders and click Download Invoice (PDF).
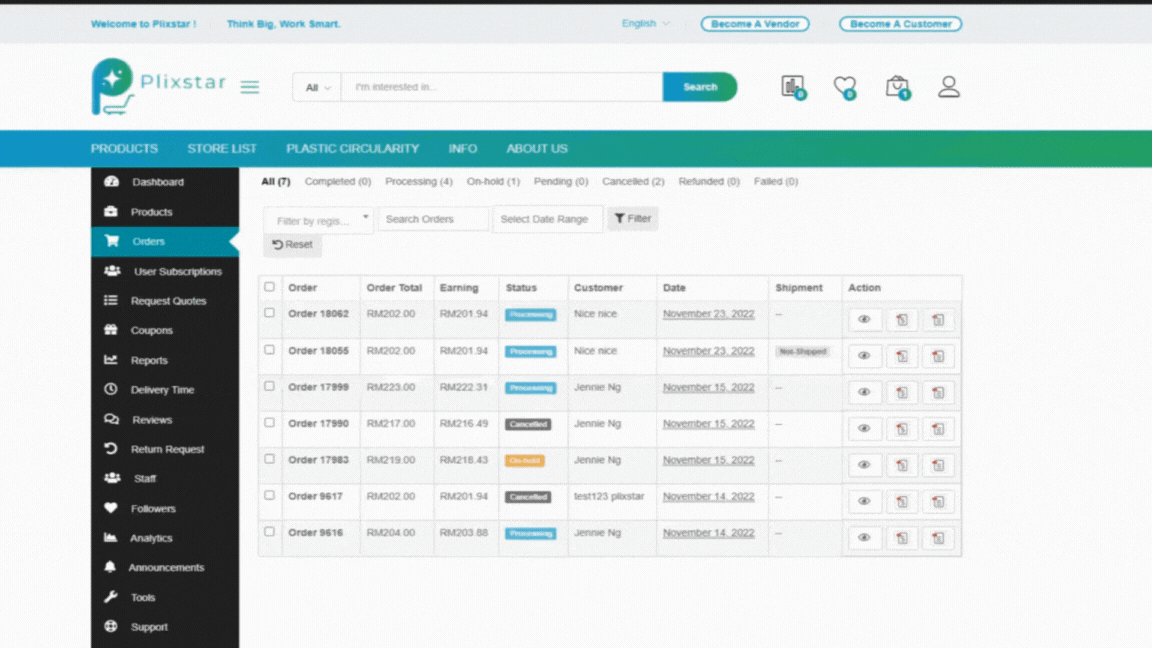
5.How to handle orders
6.What do Completed Orders mean?
Completed Orders refer to total paid orders that have been delivered to and accepted by the User. This excludes cancelled or returned/refunded orders, pending payment orders or processing orders. User to receive and accept delivery. Total Completed Orders can be viewed via Order > My Orders > Completed on Vendor Dashboard
The term “Completed Orders” refers to the total number of paid orders that have been successfully delivered to the user and accepted by them. It specifically excludes orders that have been cancelled, returned, or refunded, as well as pending payment orders and orders that are still in the processing stage. In order for an order to be considered completed, the user must receive the delivery and accept it.
To view the total number of completed orders, you can navigate to the Vendor Dashboard and access the “Order” section. From there, you can go to “My Orders” and select the “Completed” tab. This will provide you with a list or summary of all the orders that have been successfully delivered and accepted by the users.
SHIPPING
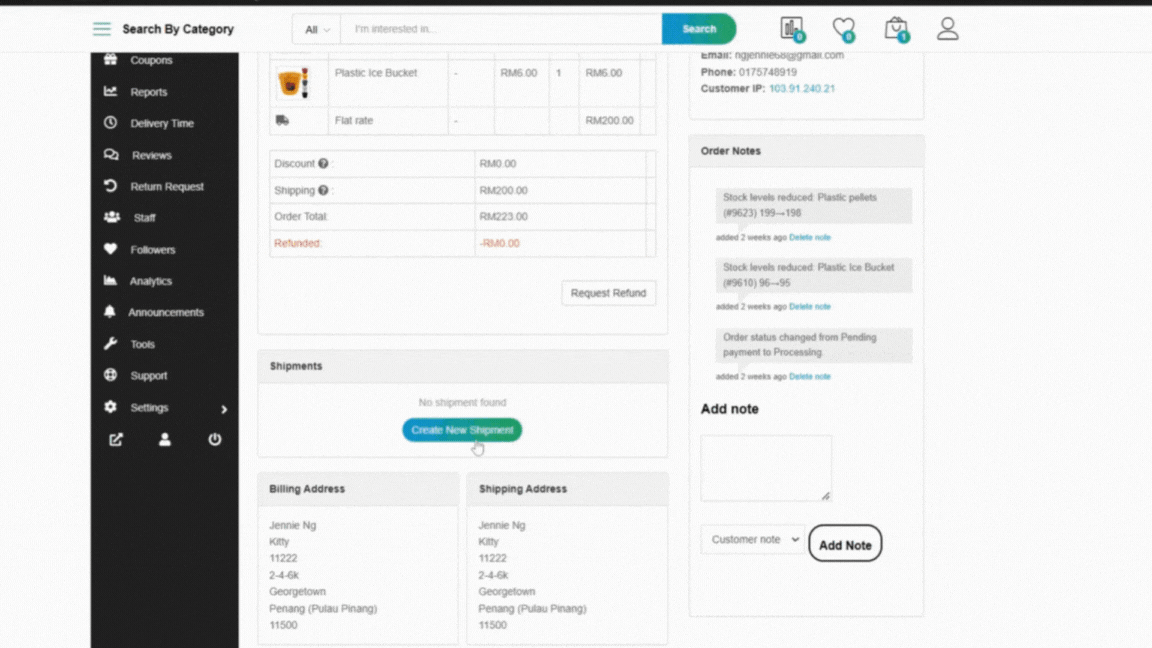
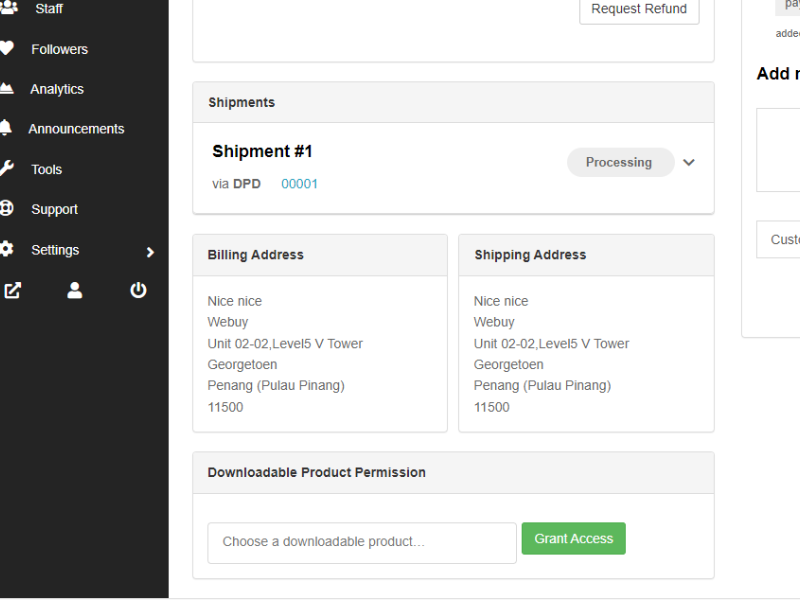
1. Can 1 order to be ship partially?
Yes, it can. But Customer must provide details and shipping details – quantity, schedule to you. So that you can arrange the shipping schedule for the order.
Dashboard – Orders, click the Order ID, Click “Create New Shipment” button. Key in all the detail and click “Create Shipment” button.

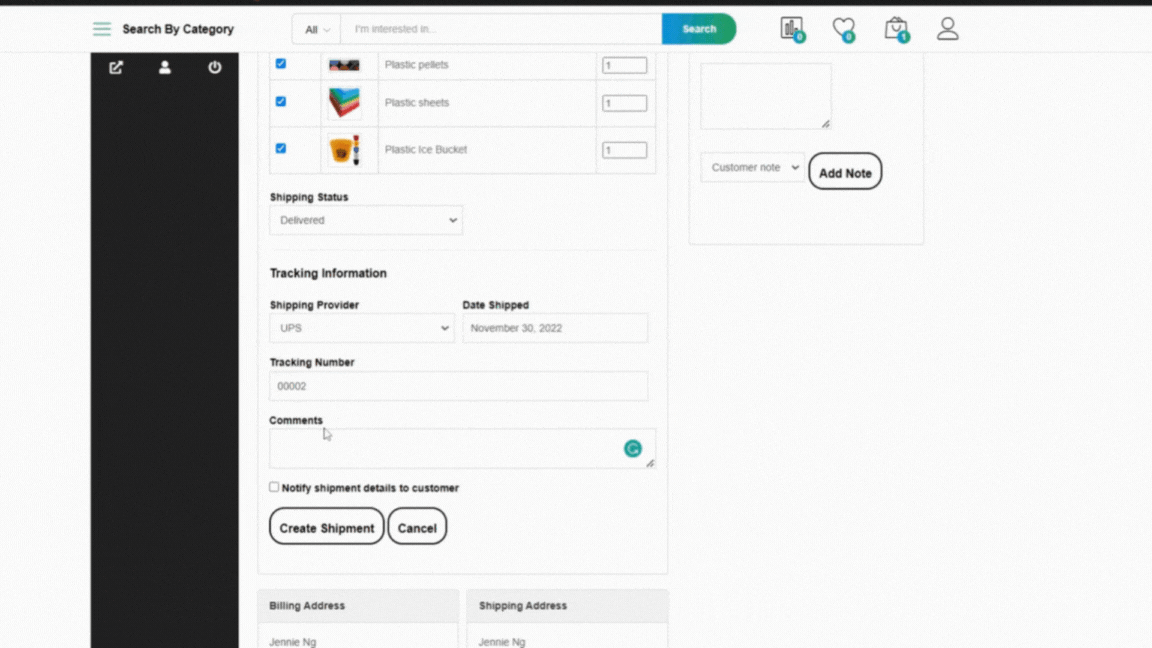
3. How to notify customer once the shipment is ready for processing?
When create the shipment, do check the “Notify shipment details to customer”. Customer will receive a shipment notification email.
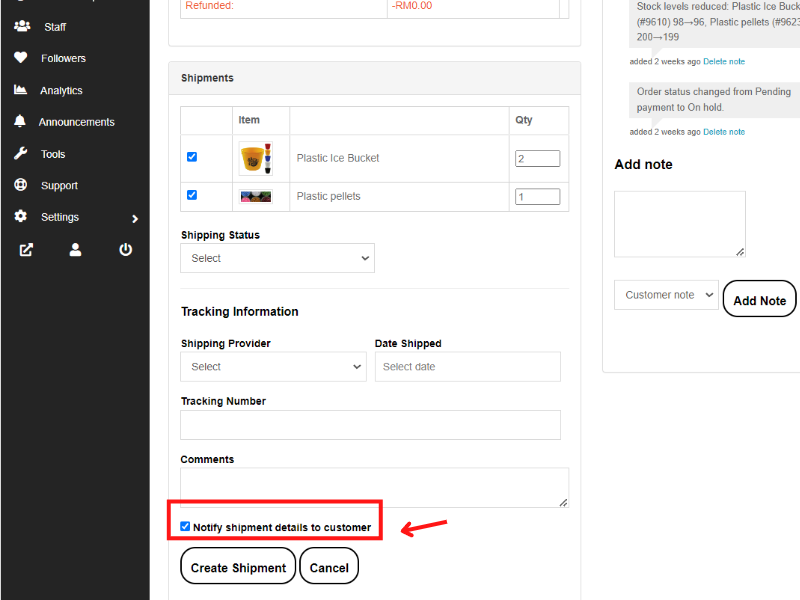
4. How to update the shipping status?
Once the shipment created, Vendor has to update the shipment status from time to time manually, customer will be able to check shipment status.
5. How to insert shipping tracking number in Plixstar?
The vendor can insert Shipping Tracking number from the order details page through “Order Notes”.
6. Create a new shipment
PAYMENT
1. How do I change my banking details ?
Click on “Setting”, go to Payment”, change the necessary banking details
2.How do Plixstar charge?
Vendor will be charged commission rate according to the table as below.
| Categories | Commission Rate (%) |
| Resin | 1 |
| Finished Good Products | 5 |
| Machinery | 10 |
3.How is commission fee calculated ?
The commission fee is calculated as below .


4.When can I expect to receive payment on Plixstar?
For Orders Completed on Plixstar on or before Friday, payment will be disburse to Vendors on the next following Friday.
RETURN & WARRANTY
1. What Vendor should do when Customer request for Refund / Replace?
Vendor will receive a request
Request for a
- Refund
- Replace
Select reason to request for warranty
- Defective Component
- Wrong Product
- Wrong Address
At “RMA Request“, there list of request refund. Select the view then can change the Status.
Then click the Order ID. Click “Request Refund”button
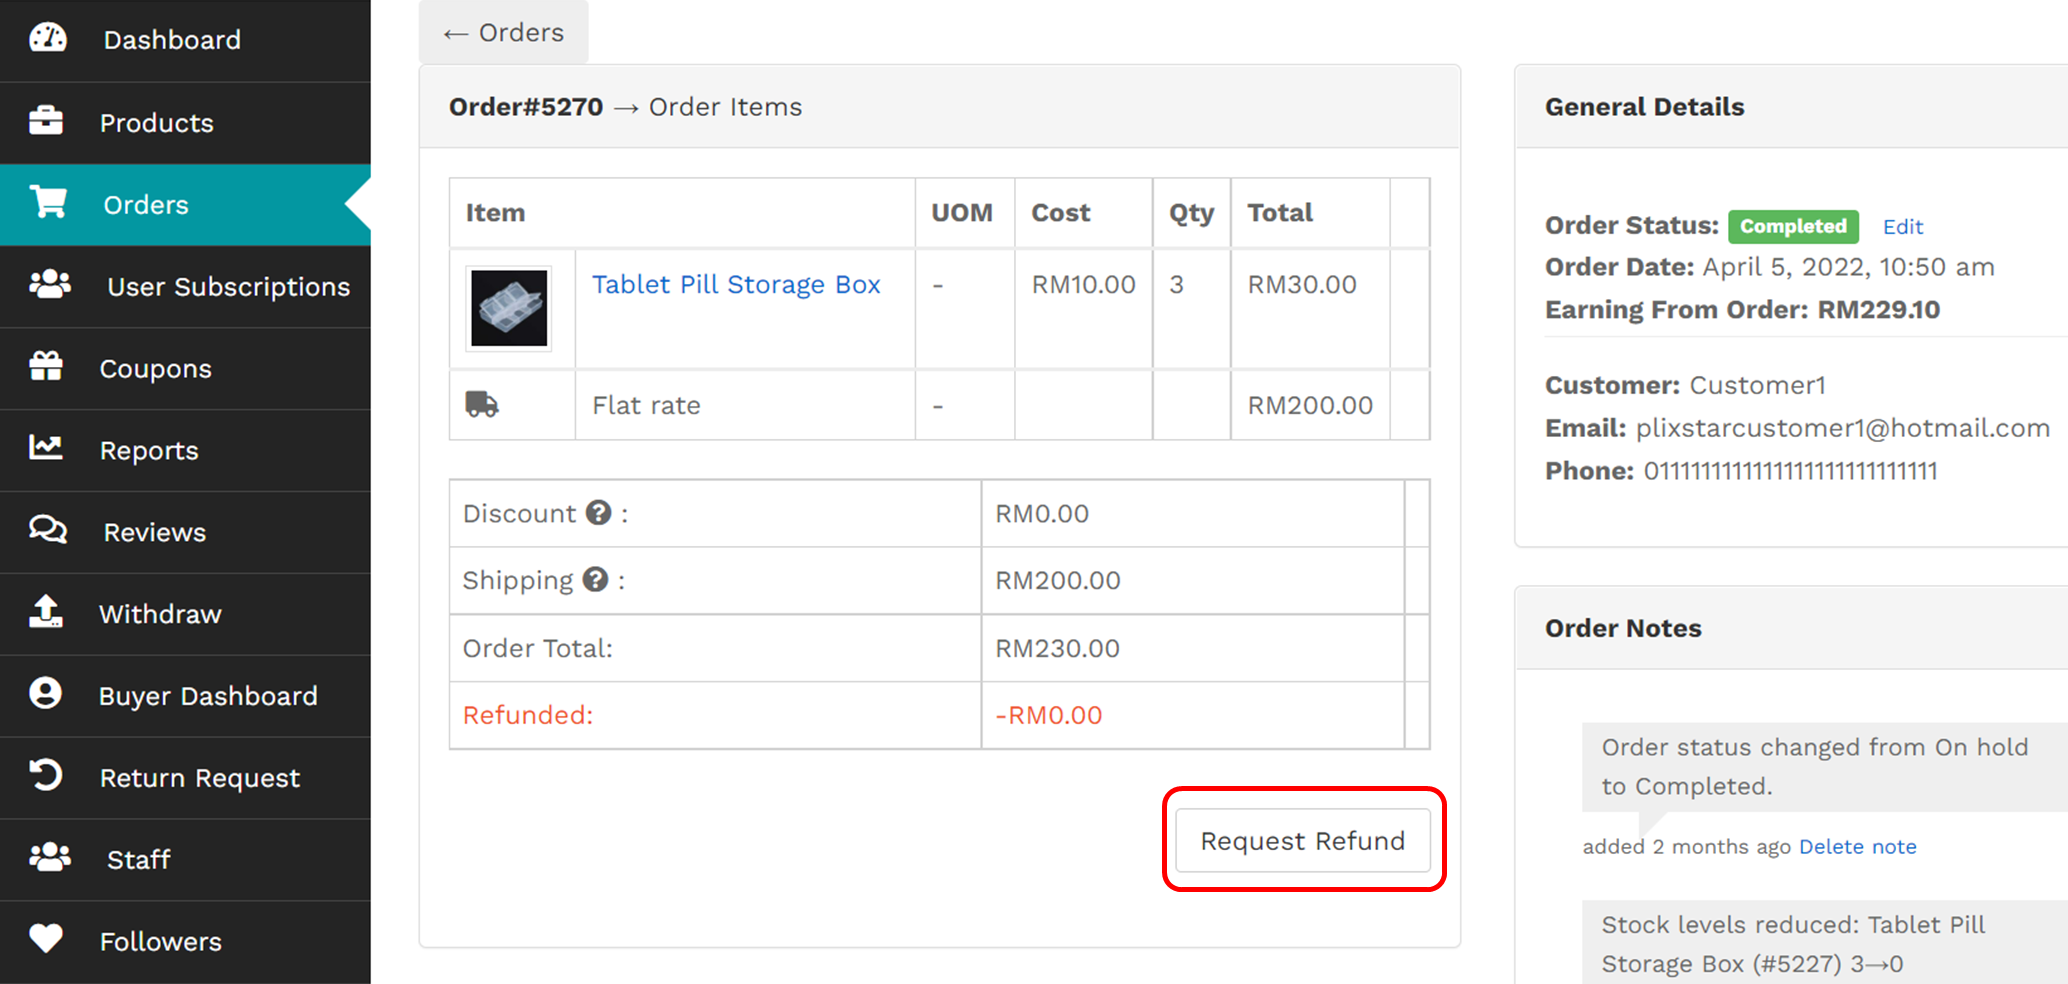
Double check and key in necessary info. Click “Refund” manually to proceed.
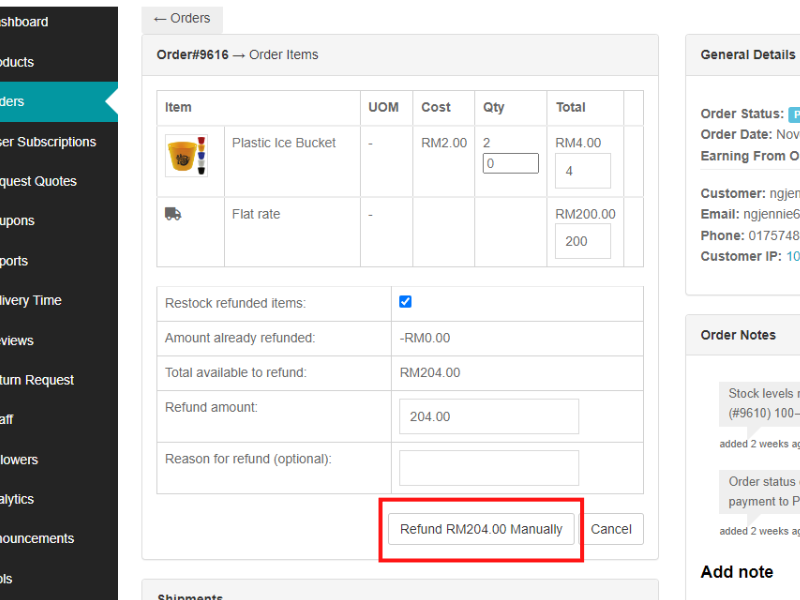
A message will prompt.

2.What should I do if there is a payment dispute between the customer on Plixstar?
The first step is for the user and the vendor to communicate directly with each other to try and resolve the dispute amicably.
They can discuss the issue, clarify any misunderstandings, and negotiate a solution.
If direct communication does not lead to a resolution, the parties can submit their dispute to Plixstar Dispute Resolution Center .
The representative may communicate with both parties, gather evidence, and propose potential solutions.
We’re Here to Help!
Contact Us